Sis and I went to our favourite yarn shop last Friday. As always when we go on trips we had a great time.
For the time being I decided to get yarn for two cardigans. So now I have plenty of yarn for the 1960 cardigan plus another cardigan that I noticed when I was browsing the knitting magazines.
In fact the two magazines I've bought have four potential candidates for future knitting, provided the first two cardigans go well.
I started knitting right away when we got home from the yarn shop. Prior to our trip I had already done a rather large swatch for the 1960 cardigan. As it turns out, I did need to go down two needle sizes, but that's normal for the technique I use.
A major difference for me, compared to knitting socks, is the tension. The tension required for a cardigan is much tighter than I'm used to. Another reason why I went down two needle sizes.
And it felt so weird to use only two needles instead of the usual five when I knit a sock.
On another note, I'm nearly done knitting the back of the 1960 cardigan.
Here's a picture:
If it seems too narrow to you, don't worry, because it's being knitted in ribbing stitch entirely. I can assure you that it's quite stretchy. As you can see, I've just started the armhole. I now need to work 8" as is, then proceed with the rest of the armhole.
Well, at least the largest piece of the cardigan is nearly done. At least the other pieces have far less stitches, so in theory they should go faster, or at least appear to, ;-))
The yarn is called Bingo, and it's from Lana Grossa.
Of course I couldn't wait to see how the other yarn would look like, so I knitted a swatch. I have no idea how the stitch is called, as it wasn't specified in the directions, but I sure like the look of it.
See picture:
It's a cardigan pattern as well, made entirely in that stitch. This yarn too is Lana Grossa, and it's called Royal Tweed. I find it a little harder to knit with, but it's very pretty and the stitch is so fun to do.
My sister advised me to do at least one cardigan from a magazine, because you can use the exact same yarn as used in the design, making it more likely that the result will look the same.
I have no picture of the design, but it's a very simple long cardigan with straight sleeves and a collar.
Oh, I can show you some finished knitting as well. When I bought the vintage cardigan patterns on Etsy I also bought this irresistible pattern for dishcloths.
And I've already made a pair:
They were so much fun to make! Cheerful, aren't they?
Lastly, I'm still contemplating what to do about a quilt for my draughty bedroom. I've decided that hand quilting would be too time consuming. After all I'm still hand quilting the lap quilt for my sister. I would prefer not to start another hand quilting project while hers isn't finished yet.
I've looked at quilts in shops, but I can't find any color I like. All the colors are ever so boring: greys, taupe, white..... bleh.
But how would I go about machine quilting?
Free motion quilting is out. It would take me too long to learn. Most likely I could do a large quilt by hand faster than attempting to get a remotely decent result by free motion quilting.
Besides, I would have to do it on my Pfaff, because my vintage Singers are hand cranks. Plus, if I use a vintage Singer for the patchwork top, I would prefer not to use an electric machine to quilt it, It just doesn't seem right somehow.
So the solution might be to quilt in the ditch by machine. If I do a log cabin top, all I would need to do is stitch the outlines of each block. Meaning I would have to do straight lines only, lengthwise and crosswise. I suppose it won't be easy anyway, because I'm not used to handling such an amount of fabric with any machine, but since it'd be straight lines it might work.
Friday, October 11, 2013
Thursday, October 3, 2013
It's getting chilly
Although the weather has been lovely in the daytime so far, nights are starting to get chilly.
I live in an old house opposite a wood. When I sit on my sofa and look out of the window all I see is trees, bushes and a path leading into the wood.
So this is what I see when I'm siting on my sofa
This picture was taken last Spring. It always sets off with the small trees and bushes, and gradually all the other trees follow. And it's such a thrill after looking at bare trees all Winter. Winters always last far too long, and I hate them with a passion.
But bare trees aren't the only reason I hate winters. The house has central heating, but only the living room is relatively warm during winters, not the bedrooms upstairs. Which is unfortunate, because my sewing room is upstairs, and so is my bedroom.
Anyway, last winter I consulted the housing company about it. Turns out that the HR-boiler is set up to heat bedrooms to 15 degrees Celsius max. Apparently you can request to change that, but then I would have to worry about my energy bill. So that's not an option.
To make matters worse, we have those ventilation things (I don't know what to call them) in the windows. Well, the thing is I have to leave them open at all times. If I don't the air gets too humid, which results in an even chillier feel in whatever room you're in.
So I leave the vents open all the time, meaning I feel the wind blow over my face when I'm in bed. And with temperatures below zero that's no fun.
So I'm thinking about a quilt to put on top of my bedding for extra warmth, since my bedroom is so draughty. But will I just buy one from Ikea or make one?
At the moment it's more likely that I'm getting a bedspread/quilt from Ikea. It would serve its purpose this winter, and give me more time to make myself a nice quilt.
After all, there's the size to consider. My bed is 47.25" wide and I want a decent overlap to keep warm and for appearance. Well now, a quilt top goes together fairly quickly, but after that you still need to quilt it. And I'm a hand quilter.
Of course I could try to machine quilt it, I suppose. Yet, that would mean handling a sizable quilt on a domestic sewing machine. Would that actually save time?
Still, it's tempting, I must say.
I live in an old house opposite a wood. When I sit on my sofa and look out of the window all I see is trees, bushes and a path leading into the wood.
So this is what I see when I'm siting on my sofa
This picture was taken last Spring. It always sets off with the small trees and bushes, and gradually all the other trees follow. And it's such a thrill after looking at bare trees all Winter. Winters always last far too long, and I hate them with a passion.
But bare trees aren't the only reason I hate winters. The house has central heating, but only the living room is relatively warm during winters, not the bedrooms upstairs. Which is unfortunate, because my sewing room is upstairs, and so is my bedroom.
Anyway, last winter I consulted the housing company about it. Turns out that the HR-boiler is set up to heat bedrooms to 15 degrees Celsius max. Apparently you can request to change that, but then I would have to worry about my energy bill. So that's not an option.
To make matters worse, we have those ventilation things (I don't know what to call them) in the windows. Well, the thing is I have to leave them open at all times. If I don't the air gets too humid, which results in an even chillier feel in whatever room you're in.
So I leave the vents open all the time, meaning I feel the wind blow over my face when I'm in bed. And with temperatures below zero that's no fun.
So I'm thinking about a quilt to put on top of my bedding for extra warmth, since my bedroom is so draughty. But will I just buy one from Ikea or make one?
At the moment it's more likely that I'm getting a bedspread/quilt from Ikea. It would serve its purpose this winter, and give me more time to make myself a nice quilt.
After all, there's the size to consider. My bed is 47.25" wide and I want a decent overlap to keep warm and for appearance. Well now, a quilt top goes together fairly quickly, but after that you still need to quilt it. And I'm a hand quilter.
Of course I could try to machine quilt it, I suppose. Yet, that would mean handling a sizable quilt on a domestic sewing machine. Would that actually save time?
Still, it's tempting, I must say.
Monday, September 23, 2013
Vintage cardigans
No sewing projects to show this time, because I'm not working on anything new at the moment.
Lately I've been hand quilting on and off for a quilt I've already shown in a previous post, and I've been busy knitting socks as well.
But as I don't want to stop blogging I thought I'd show you some gorgeous knitting patterns that I found on Etsy.com. Granted they're knitting patterns, but they're vintage so at least they're somewhat related to the focus of my blog.
So enough explanations already, here's the first cardigan:
Isn't it lovely?
The stitches are pretty straightforward: twisted ribbing, knit and purl, and a simple cable. The challenge lies in accomplishing a good fit.
The instructions provide a list of measurements you need to take to determine your size. I'm sure my sister will be happy to assist me taking them.
Next step is finding the right yarn. I'll have to try and match the gauge as accurately as I can, because it's a fitted cardigan. Besides if the chosen yarn has the correct gauge, all I need to do is follow the instructions to the letter and end up with a perfect cardigan *wishful thinking* :-))
In that respect I find sewing garments easier. My preferred method to make clothes is tacking the entire garment and put it on. Any fitting issue becomes apparent instantly and can be dealt with right away.
So, because the lovely fifties cardigan will be challenging, I treated myself to an easier to make cardigan as well. This one is called a 'Car coat' and was published in 1960, which is the year I was born.
Just look at that gorgeous collar:
I'm going to make this cardigan first, because I don't foresee any fitting problems. Of course I don't want to end up with a too over sized cardigan, but if the finished size is slightly bigger or smaller it wouldn't be that big of a deal really.
The cardigan is knitted in ribbing stitch entirely, combined with some crochet ribbing.
In Holland the most common way to knit is to tuck one needle under your right arm, and to hold the yarn in your right hand.
So you can imagine what it was like for me when I decided to knit socks. The only sock needles on the market are 7"! You can't tuck those under your arm, so what was I to do?
Well, I found the answer on a website called KnittingHelp. I had to learn what they refer to as the 'Continental method'. I believe it's quite common in the UK. Anyway, you hold the needles in your hands and you hold the yarn in your left hand.
It took me 7 weeks to master, but it was definitely worth the trouble, especially when you need to alternate between purl and knit stitches a lot.
Lately I've been hand quilting on and off for a quilt I've already shown in a previous post, and I've been busy knitting socks as well.
But as I don't want to stop blogging I thought I'd show you some gorgeous knitting patterns that I found on Etsy.com. Granted they're knitting patterns, but they're vintage so at least they're somewhat related to the focus of my blog.
So enough explanations already, here's the first cardigan:
Isn't it lovely?
The stitches are pretty straightforward: twisted ribbing, knit and purl, and a simple cable. The challenge lies in accomplishing a good fit.
The instructions provide a list of measurements you need to take to determine your size. I'm sure my sister will be happy to assist me taking them.
Next step is finding the right yarn. I'll have to try and match the gauge as accurately as I can, because it's a fitted cardigan. Besides if the chosen yarn has the correct gauge, all I need to do is follow the instructions to the letter and end up with a perfect cardigan *wishful thinking* :-))
In that respect I find sewing garments easier. My preferred method to make clothes is tacking the entire garment and put it on. Any fitting issue becomes apparent instantly and can be dealt with right away.
So, because the lovely fifties cardigan will be challenging, I treated myself to an easier to make cardigan as well. This one is called a 'Car coat' and was published in 1960, which is the year I was born.
Just look at that gorgeous collar:
I'm going to make this cardigan first, because I don't foresee any fitting problems. Of course I don't want to end up with a too over sized cardigan, but if the finished size is slightly bigger or smaller it wouldn't be that big of a deal really.
The cardigan is knitted in ribbing stitch entirely, combined with some crochet ribbing.
In Holland the most common way to knit is to tuck one needle under your right arm, and to hold the yarn in your right hand.
So you can imagine what it was like for me when I decided to knit socks. The only sock needles on the market are 7"! You can't tuck those under your arm, so what was I to do?
Well, I found the answer on a website called KnittingHelp. I had to learn what they refer to as the 'Continental method'. I believe it's quite common in the UK. Anyway, you hold the needles in your hands and you hold the yarn in your left hand.
It took me 7 weeks to master, but it was definitely worth the trouble, especially when you need to alternate between purl and knit stitches a lot.
Wednesday, August 14, 2013
Amsterdam shopping spree
Yesterday was wonderful. Sis and I went to Amsterdam on a shopping spree!
It was a huge success.
First stop was Birdblocks, my favorite quilt shop, to show them my wall hanging.
After that we took a streetcar to the Albert Cuyp area, where several fabric shops are located.
The first one was the most promising, online at least. According to their website they were supposed to have 3 stories stocked with fabrics and notions.
Unfortunately they were relocating to another building. Due to limited space they didn't have much available, so we left and decided to visit the store another time.
I was more successful at the next fabric store, where I bought this lovely pink fabric with matching lining.
Next stop was Nanucci, where they have the most wonderful fabrics. Their lace fabrics were to die for. Here at Nanucci's I purchased my most exciting fabric: a floral by Liberty of London.
Now, I've uses plenty of cotton fabrics throughout my sewing life, but I had never encountered a Liberty cotton before. Good heavens, it was quite a thrill, let me tell you. The cotton is ever so smooth and soft to the touch. Imagine what it will feel like to wear it.
Then, with a much thinner wallet but ever so happy, we headed back to the Dam Square area. When we visit Amsterdam we always go to a tiny yarn shop, which also has a quite extended range of embroidery kits.
The last time we were there I had seen this gorgeous needlework on display, depicting a spotted sow and piglets, by Elizabeth Bradley. I loved it right away, but couldn't afford it.
However, this time around the kit was on sale, so how could I resist?
And here it is:
It coordinates beautifully with the color of my living room wall.
At the same shop I also bought some sock yarn. I've been knitting socks for several years. Nowadays you have so much yummy yarns to choose from. Multicolor yarns are my favorite. It's always a surprise how they turn out, I love that.
Last but not least we went to another quilt shop, Den Haan en Wagenmakers, where I made my final purchase of the day: these cute elephant fabrics with matching border fabric.
Aren't they adorable? I might turn them into small quilts for my cats to lounge on.
It was a huge success.
First stop was Birdblocks, my favorite quilt shop, to show them my wall hanging.
After that we took a streetcar to the Albert Cuyp area, where several fabric shops are located.
The first one was the most promising, online at least. According to their website they were supposed to have 3 stories stocked with fabrics and notions.
Unfortunately they were relocating to another building. Due to limited space they didn't have much available, so we left and decided to visit the store another time.
I was more successful at the next fabric store, where I bought this lovely pink fabric with matching lining.
Next stop was Nanucci, where they have the most wonderful fabrics. Their lace fabrics were to die for. Here at Nanucci's I purchased my most exciting fabric: a floral by Liberty of London.
Now, I've uses plenty of cotton fabrics throughout my sewing life, but I had never encountered a Liberty cotton before. Good heavens, it was quite a thrill, let me tell you. The cotton is ever so smooth and soft to the touch. Imagine what it will feel like to wear it.
Then, with a much thinner wallet but ever so happy, we headed back to the Dam Square area. When we visit Amsterdam we always go to a tiny yarn shop, which also has a quite extended range of embroidery kits.
The last time we were there I had seen this gorgeous needlework on display, depicting a spotted sow and piglets, by Elizabeth Bradley. I loved it right away, but couldn't afford it.
However, this time around the kit was on sale, so how could I resist?
And here it is:
It coordinates beautifully with the color of my living room wall.
At the same shop I also bought some sock yarn. I've been knitting socks for several years. Nowadays you have so much yummy yarns to choose from. Multicolor yarns are my favorite. It's always a surprise how they turn out, I love that.
Last but not least we went to another quilt shop, Den Haan en Wagenmakers, where I made my final purchase of the day: these cute elephant fabrics with matching border fabric.
Aren't they adorable? I might turn them into small quilts for my cats to lounge on.
Wednesday, July 3, 2013
The wall hanging is ready
I finished the wall hanging some weeks ago. Then I had to find some kind of rod to hang it. And after finding one it took me a while to get around fotographing it.
So here it is:
It's a pity that I can't get the color of the wall right in pictures. It's a tad more yellow in reality. I've tried to take photos with and without direct sunlight. This was the best take yet.
Anyway the wall hanging matches very well with the color of the wall. :-))
You'll probably notice that the houses aren't very distinct, especially when viewed from a distance. I loved the color scheme so much, that I didn't make a real effort to solve that. My mind was set on that particular background fabric.
Remember the border issues? Well, I managed to get the puckering less noticeable.
In hindsight, I don't think the puckering was caused by tension problems after all. Once I finally figured out the right setting the Singer had no problems keeping that setting.
The foot might have made a difference though. The 127K came with a fixed foot, while my 15 has a hinged foot. I had been stitching the entire wall hanging with the 127K, but decided to put on the border with the 15. That's when I noticed that stitching with the hinged foot was easier.
When it comes to mitering corners I can't live without the reverse feature. That's why I wanted to use the 15.
Another thing I learned from stitching this wall hanging is that I need to iron the seams more precisely. Had I done that, then I would've noticed that I hadn't pressed some seams as neatly as I thought. So I didn't notice that I had caused some distortion that would get me in trouble later on.
The thing is, I try to avoid ironing if I can. It's a pain when you have cats. Every minute that I'm not using the iron I have to put it away in my shower and close the door. Cats are like toddlers. You wouldn't leave a hot iron unattended around little kids, would you?
Now imagine how that plays out when you're doing paper foundation piecing: stitch one very short seam; press it; disconnect the iron, and put it in the shower. And go back to your sewing; stitch another short seam; collect the iron from the shower; heat it up again; press, and put it back in the shower. Well, you get the picture.
Anyway, I'll have to come up with a solution, because careful ironing does get you better results. I'm sure I'll think of something brilliant one day.........
So here it is:
It's a pity that I can't get the color of the wall right in pictures. It's a tad more yellow in reality. I've tried to take photos with and without direct sunlight. This was the best take yet.
Anyway the wall hanging matches very well with the color of the wall. :-))
You'll probably notice that the houses aren't very distinct, especially when viewed from a distance. I loved the color scheme so much, that I didn't make a real effort to solve that. My mind was set on that particular background fabric.
Remember the border issues? Well, I managed to get the puckering less noticeable.
In hindsight, I don't think the puckering was caused by tension problems after all. Once I finally figured out the right setting the Singer had no problems keeping that setting.
The foot might have made a difference though. The 127K came with a fixed foot, while my 15 has a hinged foot. I had been stitching the entire wall hanging with the 127K, but decided to put on the border with the 15. That's when I noticed that stitching with the hinged foot was easier.
When it comes to mitering corners I can't live without the reverse feature. That's why I wanted to use the 15.
Another thing I learned from stitching this wall hanging is that I need to iron the seams more precisely. Had I done that, then I would've noticed that I hadn't pressed some seams as neatly as I thought. So I didn't notice that I had caused some distortion that would get me in trouble later on.
The thing is, I try to avoid ironing if I can. It's a pain when you have cats. Every minute that I'm not using the iron I have to put it away in my shower and close the door. Cats are like toddlers. You wouldn't leave a hot iron unattended around little kids, would you?
Now imagine how that plays out when you're doing paper foundation piecing: stitch one very short seam; press it; disconnect the iron, and put it in the shower. And go back to your sewing; stitch another short seam; collect the iron from the shower; heat it up again; press, and put it back in the shower. Well, you get the picture.
Anyway, I'll have to come up with a solution, because careful ironing does get you better results. I'm sure I'll think of something brilliant one day.........
Friday, June 28, 2013
Summer Dress
Lately I've been reading much about sewing garments in the blogs I follow daily. It's so enjoyable to read all about their adventures that I was totally in the mood to make something too.
As it happens I discovered only recently, at the age of 53 no less, that knee length dresses don't work for me because I'm short. So when that eye opening moment finally occurred I immediately started to shop for some new dress patterns.
This is the one I'm working on:
The design is a princess line with short sleeves, button down closure, and a collar with stand. The sleeves are gathered, but only at the the top. Needless to say they were very easy to sew, since there was no easing involved.
Much to my delight the collar with stand went quite well too. I was a bit worried because I never made a collar with stand before.
I've sewn one side of the collar stand to the dress with the sewing machine. The inner side, which is pinned in the photo, is going to be hand sewn.
Now that I'm looking at the photo I'm not sure whether I should have sewn the inner stand to the dress, thus having the hand sewing hidden by the collar when I wear the dress. I'll keep it in mind for the next dress, and try how it looks when I do it the other way around.
I love how the sleeves turned out, but I'm not happy with how the buttonholes turned out. I used the regular sewing thread to make them. Perhaps I should have used a thicker thread. But how to thread the machine then? A thicker upper thread and the regular sewing thread in the bobbin? I have no idea. Luckily the buttonholes will be less noticeable once the buttons are sewn on.
The pockets are a nice detail, I think.
This is a fun project overall. And several first times are involved, like making buttonholes, and a collar with a stand.This fabric, however was so cheap that I bought 6 meters of it. It's incredible, but the fabric cost only 1 Euro per meter, and the width is 1.40 m.!!! No wonder I didn't fret about making mistakes.
The dress is being sewn using the Pfaff and the Juki.
As it happens I discovered only recently, at the age of 53 no less, that knee length dresses don't work for me because I'm short. So when that eye opening moment finally occurred I immediately started to shop for some new dress patterns.
This is the one I'm working on:
The design is a princess line with short sleeves, button down closure, and a collar with stand. The sleeves are gathered, but only at the the top. Needless to say they were very easy to sew, since there was no easing involved.
Much to my delight the collar with stand went quite well too. I was a bit worried because I never made a collar with stand before.
I've sewn one side of the collar stand to the dress with the sewing machine. The inner side, which is pinned in the photo, is going to be hand sewn.
Now that I'm looking at the photo I'm not sure whether I should have sewn the inner stand to the dress, thus having the hand sewing hidden by the collar when I wear the dress. I'll keep it in mind for the next dress, and try how it looks when I do it the other way around.
The pockets are a nice detail, I think.
This is a fun project overall. And several first times are involved, like making buttonholes, and a collar with a stand.This fabric, however was so cheap that I bought 6 meters of it. It's incredible, but the fabric cost only 1 Euro per meter, and the width is 1.40 m.!!! No wonder I didn't fret about making mistakes.
The dress is being sewn using the Pfaff and the Juki.
Sunday, June 23, 2013
Meet the rest of the gang
Finally I have time to blog again. The past weeks I've been very busy, but not with fun stuff unfortunately.
Anyway, this post is about my other machines. Apart from my two hand machines I own four more.
The Singer 191B
The 191B is the machine I learned to sew on. It was my Mum's, but she gave it to me when I showed some interest in learning to sew. No zigzag, strictly straight stitch, and still going strong.
I have many fond memories of sewing on it, especially because my Mum was still alive the last time I used it, and some of the clothes I made on it I still have.
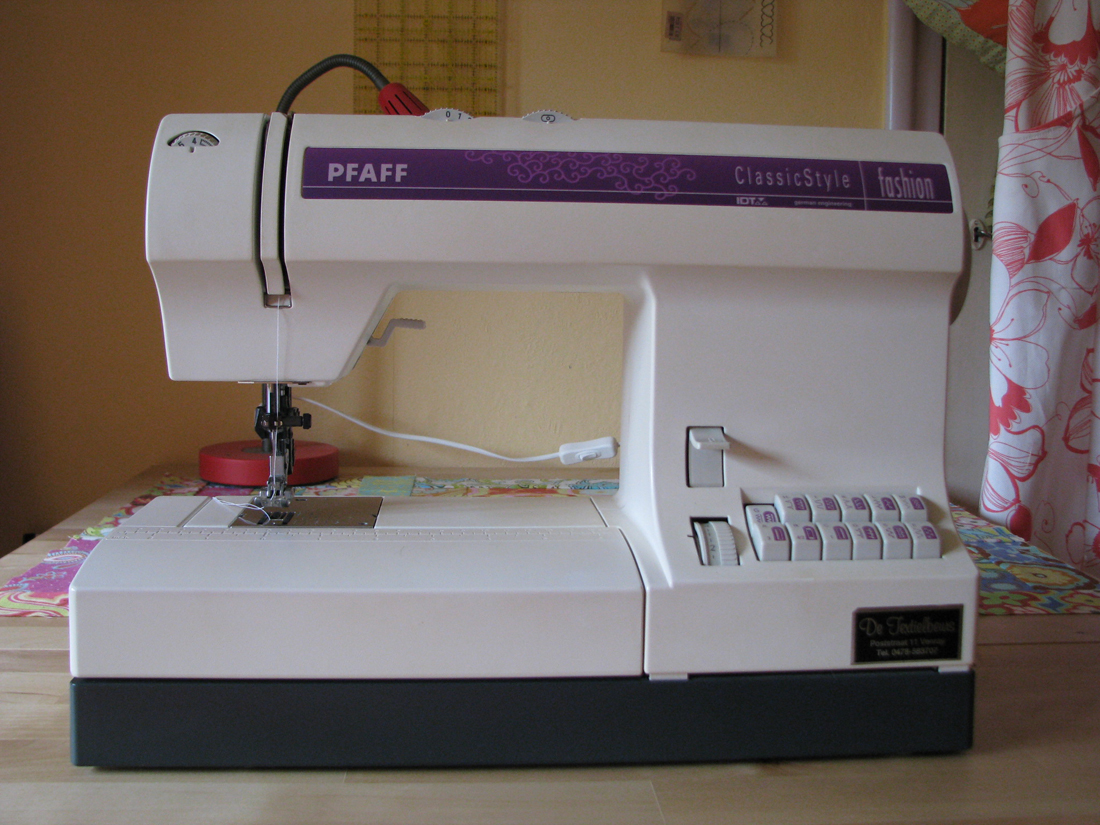
The Pfaff Fashion Select
The Pfaff is my go to machine when I sew clothes.
As you can see it's a mechanical machine. Apart from the money involved, I wasn't keen on computerized sewing machines. For one I wasn't sure to what extent the computer would automate things, leaving me with not enough control over it. And secondly the fuss of updating software, not to mention software issues.
Anyway, I'm very pleased with this machine. I love that you can change the needle position. I often use that feature to get an accurate seam allowance.
Then there's the built-in walking foot. I think it's brilliant. As a matter of fact it's the main reason for choosing a Pfaff in the first place.
The Pfaff walking foot can be engaged or disengaged in a split second. Furthermore it's never in the way, and you can see exactly what you're doing at all times.
The Janome CoverPro
The Janome CoverPro is very user friendly. It's very easy to thread. It produces very nice stitches.
Due to lack of sewing projects I haven't used it much yet, regrettably, because it really is a fun machine to sew on. I've experimented with 4 and 3 threads.
I believe you can also use it for chain stitching, but I've never tried yet.
There are two ways to cut the threads when you finish your stitching. It depends on whether the stitching will be secured by another seam or whether you want to stop in the middle of the fabric if you're doing decorative stitching. This how to video on YouTube explains it better than I can.
The Juki Overlocker
Last but certainly not least is my Juki Overlocker. My Juki was truly love at first sight. Or rather at first sound really. When I heard the sound of its motor the first time, that was it. I knew this was the one. It sounds ever so smooth, almost velvety if that makes sense. It's quite hard to describe.
It's a joy to use. Threading it is relatively easy. It's a bit intimidating at first but the more you do it the easier it gets. This particular model, the MO-654, has a lever which makes it easier to thread the lower looper thread. The most basic Juki overlocker doesn't have that feature.
I consider myself very fortunate. I own all the machines I ever desired.
And I cherish all of them.
Anyway, this post is about my other machines. Apart from my two hand machines I own four more.
The Singer 191B
![]() |
| Singer 191B |
The 191B is the machine I learned to sew on. It was my Mum's, but she gave it to me when I showed some interest in learning to sew. No zigzag, strictly straight stitch, and still going strong.
I have many fond memories of sewing on it, especially because my Mum was still alive the last time I used it, and some of the clothes I made on it I still have.
The Pfaff Fashion Select
![]() |
| Pfaff Fashion Select |
The Pfaff is my go to machine when I sew clothes.
As you can see it's a mechanical machine. Apart from the money involved, I wasn't keen on computerized sewing machines. For one I wasn't sure to what extent the computer would automate things, leaving me with not enough control over it. And secondly the fuss of updating software, not to mention software issues.
Anyway, I'm very pleased with this machine. I love that you can change the needle position. I often use that feature to get an accurate seam allowance.
Then there's the built-in walking foot. I think it's brilliant. As a matter of fact it's the main reason for choosing a Pfaff in the first place.
The Pfaff walking foot can be engaged or disengaged in a split second. Furthermore it's never in the way, and you can see exactly what you're doing at all times.
![]() |
| Walking foot engaged |
![]() |
| Walking foot disengaged |
The Janome CoverPro
![]() |
| Janome CoverPro |
The Janome CoverPro is very user friendly. It's very easy to thread. It produces very nice stitches.
Due to lack of sewing projects I haven't used it much yet, regrettably, because it really is a fun machine to sew on. I've experimented with 4 and 3 threads.
I believe you can also use it for chain stitching, but I've never tried yet.
There are two ways to cut the threads when you finish your stitching. It depends on whether the stitching will be secured by another seam or whether you want to stop in the middle of the fabric if you're doing decorative stitching. This how to video on YouTube explains it better than I can.
The Juki Overlocker
![]() |
| Juki Overlocker |
Last but certainly not least is my Juki Overlocker. My Juki was truly love at first sight. Or rather at first sound really. When I heard the sound of its motor the first time, that was it. I knew this was the one. It sounds ever so smooth, almost velvety if that makes sense. It's quite hard to describe.
It's a joy to use. Threading it is relatively easy. It's a bit intimidating at first but the more you do it the easier it gets. This particular model, the MO-654, has a lever which makes it easier to thread the lower looper thread. The most basic Juki overlocker doesn't have that feature.
I consider myself very fortunate. I own all the machines I ever desired.
And I cherish all of them.
Subscribe to:
Posts (Atom)